|
|
Post by Dragon Man on Oct 31, 2019 7:12:34 GMT
One of our club members, Mike, like many people, is fed up setting up his gear every observing session. You know the procedure: Set up the mount, attach cameras, cables, assemble chair, table, laptop, polar align, star alignment, etc etc . . . . and on and on it goes. But, we also know the solution for those that have the location for it: An Observatory. But Mike didn't want his Observatory at his house, he wants it here at our Club site so he can still enjoy doing his astronomy around other members. And that's how this observatory has come about. So Mike and I are currently building Mike an Observatory next to our main observatory. Here's a few pics to show where we are up to and I will update it as construction moves along  This first pic shows Mike checking the wall height and location of walls. 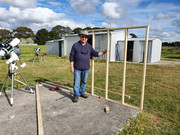 All happy, it's time to go ahead and build it  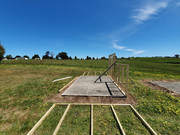  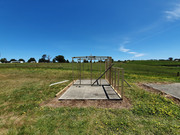 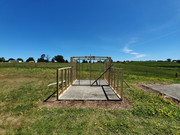 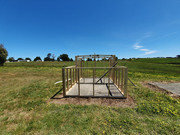 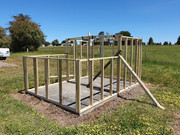 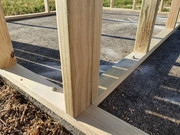  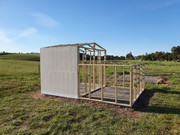 |
|
elpajare
Member

Posts: 438  home town/country: Girona-Spain
time zone gmt +/-: 1
home town/country: Girona-Spain
time zone gmt +/-: 1
|
Post by elpajare on Oct 31, 2019 8:01:13 GMT
An observatory, although simple, helps a lot.
Especially from certain ages ...
Congratulations and enjoy it many nights.
|
|
|
|
Post by Dragon Man on Nov 6, 2019 12:24:55 GMT
Rain put a stop to our work several times in the last few days. Sometimes quite heavy but we managed to get quite a bit more done yesterday before a massive storm came through and put a stop to everything: 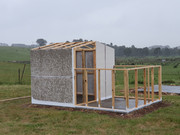 Then today we got back into it until we were too worn out and darkness was coming. At least we got all the rest of the walls and roof up and topped it off with the ridge capping 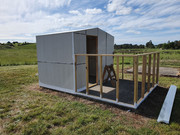  Nothing wrong with over-engineering 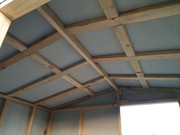
We don't expect to get much done for a while as rain is forecast for the next 4 or 5 days  |
|
elpajare
Member
Posts: 438
home town/country: Girona-Spain
time zone gmt +/-: 1
|
Post by elpajare on Nov 6, 2019 16:07:31 GMT
I admire the ease you have of working wood. Here in our country it is not usually done.
Bricks or concrete blocks with iron beams and tile roofs are used. As an alternative for small buildings we use prefabricated reinforced plastic shed.
|
|
|
|
Post by Dragon Man on Nov 6, 2019 17:09:06 GMT
Carlos, even our Brick houses have wooden frames here in Australia.
|
|
elpajare
Member
Posts: 438
home town/country: Girona-Spain
time zone gmt +/-: 1
|
Post by elpajare on Nov 6, 2019 18:28:46 GMT
Yes, I agree on this. All frames and doors used to be made of wood.
But even now PVC and aluminum frames are used more. In any material store you find them of all sizes and very cheap.
Here it is more expensive to order a frame and a wooden window than to buy it in prefabricated PVC.
The carpenters in my town charge me € 20 every hour of work!
|
|
Deleted
Deleted Member
Posts: 0
|
Post by Deleted on Nov 7, 2019 0:58:09 GMT
Ken,will the mount and scope be housed in the shed and moved out onto the verandah for each use? For mounts like a HEQ5 or similar size, I have often wondered if that is easier than a sliding roof.
cheers
Paul
|
|
|
|
Post by Dragon Man on Nov 7, 2019 11:24:22 GMT
Ken,will the mount and scope be housed in the shed and moved out onto the verandah for each use? For mounts like a HEQ5 or similar size, I have often wondered if that is easier than a sliding roof. cheers Paul It will have a Sliding roof Paul. with the gear set up permanently in the outside section. That's why it's being built, so the gear doesn't have to be moved and set up each time. The 'shed' is the warm room The roll-off roof will roll overtop of the warm room, so no extended frame will be needed as seen on most roll-off-roof observatories. |
|
|
|
Post by Dragon Man on Dec 9, 2019 9:14:32 GMT
UPDATE Here is the up-to-date report on the construction so far: CHECKING THE HEIGHT OF THE SCOPE AGAINST THE HEIGHT OF THE ROLLBACK ROOF It needs a clearance of about 2 or 3 inches to never hit when the scope is in the HOME position 
IT CERTAINLY PASSED THE TEST!!! 
LUNCHTIME. TIME TO TEST THE WARM ROOM AS A BBQ SHELTER 
ALL CEMENT SHEETING NOW FINISHED  CEMENT SHEETING OVERHANG  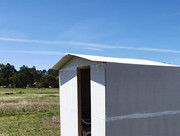 FIXED! 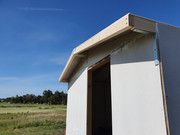 TIME TO START PAINTING. A WHITE ROOF TO REFLECT THE DAYTIME HEAT. 
continued . . . next post |
|
|
|
Post by Dragon Man on Dec 9, 2019 9:31:42 GMT
THROW ON DARK BLUE PAINT to match the other observatory on our site (the sheep are for our next BBQ) 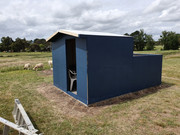 Here's where we check our construction of the rollback walls for height 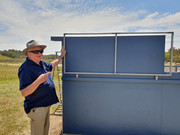 Happy with the measurements I clamp, bolt, and weld the rollback roof frame together 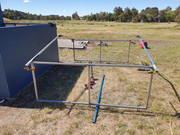  Nice clearance!  HERE'S HOW THE TRACK IS CONSTRUCTED. HERE'S HOW THE TRACK IS CONSTRUCTED.It is Aluminium 'U' channel 25mm wide 20mm high, with 2 x 15mm flat laid inside so the wheels don't go bump, bump, bump over the screws holding the 'U' channel down. 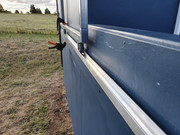 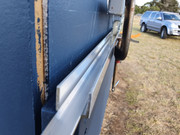 and here's the roof sheets fitted  The Rollback Roof in it's Closed position 
and rounding off this update is today's effort (9 Dec 2019) fitting the Solar Panels to the roof and finished the inside door. 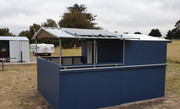
Tomorrow will be busy attaching side walls to the rollback section, fitting the main entry door, insulating and lining inside. Still to come after that is building the desk, electrical wiring for power and lights, etc etc More soon |
|
|
|
Post by Dragon Man on Jan 2, 2020 13:12:44 GMT
OK, time for an update.Here's how the Roof section is prevented from lifting off and blowing away. The Steel hooks under the track so it can't lift: 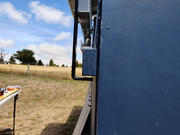 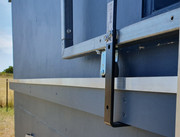 Walls going on the rollback section: 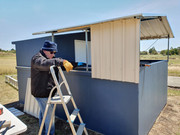  Now to fill in the gaping hole in the end. I made a lightweight aluminium frame and covered it in tin too: 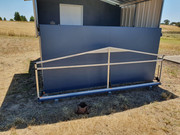 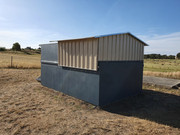 I made it hinged so it can easily be lifted up and down: 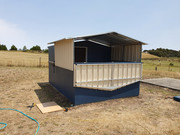 and this is how it locks inside: 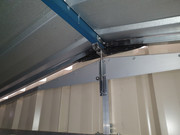 The whole rollback section is locked shut with these: 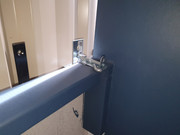 and it also gets locked in the 'open' position so the wind doesn't close it while you are observing:  The scope fits in easily when the roof is closed. Plenty of space above the scope: 
|
|
|
|
Post by Dragon Man on Jan 2, 2020 13:27:48 GMT
|
|
|
|
Post by davy on Jan 2, 2020 13:53:40 GMT
Looking brilliant
|
|
Deleted
Deleted Member
Posts: 0
|
Post by Deleted on Jan 2, 2020 15:22:11 GMT
Looking great Ken.
Jealous of those panoramic views in Snake Valley
Insulation is what I dont have.
My pod is like a pizza oven in summer.
cheers
Paul
|
|
|
|
Post by Dragon Man on Jan 2, 2020 16:23:26 GMT
Looking great Ken. Jealous of those panoramic views in Snake Valley Insulation is what I dont have. My pod is like a pizza oven in summer. cheers Paul Hey Paul, try using the spray foam. It should work. |
|
|
|
Post by Dragon Man on Jan 3, 2020 6:53:57 GMT
Looking great Ken. Jealous of those panoramic views in Snake Valley Insulation is what I dont have. My pod is like a pizza oven in summer. cheers Paul Hey Paul, try using the spray foam. It should work. Also, paint the outside of the domed section Gloss white. It does an amazing job of reflecting most of the solar radiation. As an example, on Mikes Observatory above, that one that this thread is about, the walls are dark blue and the controlroom roof is white. In these extreme temperatures we are currently having the walls are very very hot to touch on the inside, but the roof is still cool even though it is facing directly at the sun more that the walls are. And that's before we insulated it all! Both Mike and I felt it and commented to each other about it. Both roof and walls are just Cement Sheet, but the Gloss white makes such an amazing difference. A coat of Gloss White on the outside of the dome, a thin coat of spray foam on the inside, and you'll have a giant refrigerator to keep you cool on hot days and nights |
|
Deleted
Deleted Member
Posts: 0
|
Post by Deleted on Jan 3, 2020 7:56:18 GMT
Thanks for that ,Ken.
I really need to it otherwise my favorite scope is shelved for 3 months.
Also my shed is left open all summer. I guess the same should be applied to it . It is one of those Bunnings sheds. You know, the ones that you assemble in a couple of hours. Yeah right. Ended up hiring a couple of blokes to put it together for me.
cheers
Paul
|
|
elpajare
Member
Posts: 438
home town/country: Girona-Spain
time zone gmt +/-: 1
|
Post by elpajare on Jan 3, 2020 8:21:01 GMT
Congratulations, it is a large and comfortable observatory. It fits everything and you will not be cold in winter-
|
|


