

Post by Dragon Man on Jan 25, 2015 7:30:03 GMT
Note: This tutorial is for when using Colour CCD imagers which have a CMYG filter matrix. NOT for USB cameras with CMOS sensors which have RGB Bayer Matrix (for CMOS sensors please see note at the end of this post)
______________________________________
Using Achromats in Video
Many of us are familiar with the drawbacks of using Achromat refractors whether it be Visual, Astrophotography or Video.
There are two drawbacks when using an Achromat. False Colour and Violet Fringing. BUT, I am about to help you achieve stunning results with Achromats.
Firstly, let's look at the problems for anyone unfamiliar with using an Achromat Refractor.
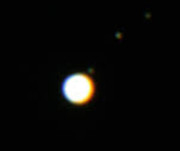
The first one is the false colour around bright objects like the Moon and the Planets. It is called 'Chromatic Aberration'.
It is the distortion in which there is a failure of a lens to focus all colours at the same focal point at the camera sensor or eyepiece. The most common recognisable effect for Astronomers is the Blue light on one side and the Yellow light on the opposite side of objects:
It makes sharp Focussing practically impossible and looks ugly.
The second problem is called 'Violet Fringing' and is the effect of a blue, to purple, to hot pink glow around bright stars and other very bright objects:

To compound the problem, the faster the Scope, the worse the problem is. In Video Astronomy we like to go FAST. I use f/5 Achromats which have horrid C.A. and Violet Fringing.
Well, there is hope for anyone wanting to use an Achromat for Video, which is great news because very large Achromats can be purchased at very reasonable prices, usually about 10% - 20% the cost of an equivalent Apochromat Refractor.
And often some people have an Achromat but don't use it for Video because of the above mention problems.
The resulting views won't be as sharp and as crisp as an Apochromat, but it won't cost you the mortgage on your house either!
OK, here's how we clean up the view.
1. A very good quality Infrared and Ultraviolet cut filter. I personally use an Astronomiks UV/IR 'L' filter as I have had the best results over a couple of other brands.
This filter will prevent Star Bloat which is common in Refractors and already starts to reduce the amount of Violet Fringing.
Unfortunately cheap IR or UV/IR cut filters aren't always successful. It is best to buy a good one like Astronomiks, Baader, or Hutech. But if they are too expensive a cheaper IR cut filter will be OK.
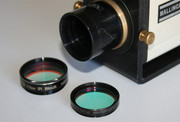
2. The most important filter you'll ever buy for your Achromat - a Wratten filter #8 Yellow or #12 Deep Yellow.
These filters are the ones that do the magic! They cut the badly focussed Blue light and blends the yellow, eliminating Chromatic Aberration, PLUS they totally eliminate the Violet Fringing. Another advantage with these #8 and #12 filters is a slight increase in contrast and they are cheap. Often under $30 for a 2" and under $20 for a 1.25".
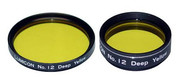
Experimentation has taught me that small scopes like 80mm 100mm and even 120mm Achromats are fine with the #8, but I had to use the #12 in my 6" (150mm) f5 Achromat.
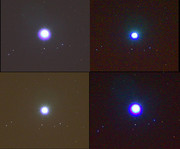
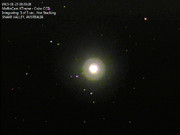
Don't just take my word for it. Proof is in the seeing, so I took Screen Grabs of Sirius and M42 with a Minus Violet filter (which is supposed to remove Violet Fringing but doesn't), and with a #12 Deep Yellow filter (both images have the Astronomiks UV/IR 'L' filter fitted).
The results were so amazing that I had to reduce the integration time on Sirius and it was still brighter.
You be the judge
Sirius with UV/IR Filter plus Minus Violet Filter (note the hot pink star!)
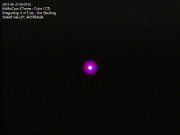
Sirius with UV/IR Filter plus #12 Deep Yellow Filter (no Pink, Violet, or blue fringes and the integration time had to be reduced due to better light transmission)
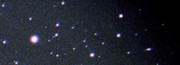
M42 with UV/IR Filter plus Minus Violet Filter (there's those hot pink stars again!)
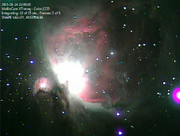
M42 with UV/IR Filter plus #12 Deep Yellow Filter (note C.A and Violet-fringing is gone but Contrast and colour is increased)
When using a yellow filter and you find that you don't like the slight yellow colour throughout your view, use the software to alter the 'Hue' until it looks normal.
Good luck, and get those Achromats out there under the skies
................................
Note: When using CMOS sensors (they have an RGB Filter Matrix) the Minus Violet Filter is far better than the #8 or #12 Yellow filters mentioned above.
CMYG filtered CCD imagers and RGB filtered CMOS Imagers see different parts of the spectrum and require different filtering. Both will still need an IR or UV/IR cut filter.
______________________________________
Using Achromats in Video
Many of us are familiar with the drawbacks of using Achromat refractors whether it be Visual, Astrophotography or Video.
There are two drawbacks when using an Achromat. False Colour and Violet Fringing. BUT, I am about to help you achieve stunning results with Achromats.
Firstly, let's look at the problems for anyone unfamiliar with using an Achromat Refractor.
The first one is the false colour around bright objects like the Moon and the Planets. It is called 'Chromatic Aberration'.
It is the distortion in which there is a failure of a lens to focus all colours at the same focal point at the camera sensor or eyepiece. The most common recognisable effect for Astronomers is the Blue light on one side and the Yellow light on the opposite side of objects:
It makes sharp Focussing practically impossible and looks ugly.
The second problem is called 'Violet Fringing' and is the effect of a blue, to purple, to hot pink glow around bright stars and other very bright objects:
To compound the problem, the faster the Scope, the worse the problem is. In Video Astronomy we like to go FAST. I use f/5 Achromats which have horrid C.A. and Violet Fringing.
Well, there is hope for anyone wanting to use an Achromat for Video, which is great news because very large Achromats can be purchased at very reasonable prices, usually about 10% - 20% the cost of an equivalent Apochromat Refractor.
And often some people have an Achromat but don't use it for Video because of the above mention problems.
The resulting views won't be as sharp and as crisp as an Apochromat, but it won't cost you the mortgage on your house either!
OK, here's how we clean up the view.
1. A very good quality Infrared and Ultraviolet cut filter. I personally use an Astronomiks UV/IR 'L' filter as I have had the best results over a couple of other brands.
This filter will prevent Star Bloat which is common in Refractors and already starts to reduce the amount of Violet Fringing.
Unfortunately cheap IR or UV/IR cut filters aren't always successful. It is best to buy a good one like Astronomiks, Baader, or Hutech. But if they are too expensive a cheaper IR cut filter will be OK.
2. The most important filter you'll ever buy for your Achromat - a Wratten filter #8 Yellow or #12 Deep Yellow.
These filters are the ones that do the magic! They cut the badly focussed Blue light and blends the yellow, eliminating Chromatic Aberration, PLUS they totally eliminate the Violet Fringing. Another advantage with these #8 and #12 filters is a slight increase in contrast and they are cheap. Often under $30 for a 2" and under $20 for a 1.25".
Experimentation has taught me that small scopes like 80mm 100mm and even 120mm Achromats are fine with the #8, but I had to use the #12 in my 6" (150mm) f5 Achromat.
Don't just take my word for it. Proof is in the seeing, so I took Screen Grabs of Sirius and M42 with a Minus Violet filter (which is supposed to remove Violet Fringing but doesn't), and with a #12 Deep Yellow filter (both images have the Astronomiks UV/IR 'L' filter fitted).
The results were so amazing that I had to reduce the integration time on Sirius and it was still brighter.
You be the judge

Sirius with UV/IR Filter plus Minus Violet Filter (note the hot pink star!)
Sirius with UV/IR Filter plus #12 Deep Yellow Filter (no Pink, Violet, or blue fringes and the integration time had to be reduced due to better light transmission)
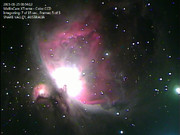
M42 with UV/IR Filter plus Minus Violet Filter (there's those hot pink stars again!)
M42 with UV/IR Filter plus #12 Deep Yellow Filter (note C.A and Violet-fringing is gone but Contrast and colour is increased)
When using a yellow filter and you find that you don't like the slight yellow colour throughout your view, use the software to alter the 'Hue' until it looks normal.
Good luck, and get those Achromats out there under the skies
................................
Note: When using CMOS sensors (they have an RGB Filter Matrix) the Minus Violet Filter is far better than the #8 or #12 Yellow filters mentioned above.
CMYG filtered CCD imagers and RGB filtered CMOS Imagers see different parts of the spectrum and require different filtering. Both will still need an IR or UV/IR cut filter.


 A yellow filter is $19